Video files can be large. This makes them harder to share and they take up a lot of space on your computer. This minHour teaches how to reduce the size of video files, including the resolution and the final file size on Windows and Mac computers, as well as on your iPhone, iPad, and Android smartphones and tablets.
Using Handbrake (Windows and Mac)
Download and install Handbrake.
Handbrake is a free and open-source video transcoder that can be used to reduce the size of video file and convert them to different video formats. Use the following steps to download and install Handbrake:
- Windows:Visit https://handbrake.fr/downloads.php in your browser.Click the Download (64 bit) below “Windows”.Click the installer file in your Downloads folder or web browser.Click Yes when prompted by Windows.Click Next.Click Next again.Click Install.Click Finish at the end of the installation.
- Visit https://handbrake.fr/downloads.php in your browser.
- Click the Download (64 bit) below “Windows”.
- Click the installer file in your Downloads folder or web browser.
- Click Yes when prompted by Windows.
- Click Next.
- Click Next again.
- Click Install.
- Click Finish at the end of the installation.
- Mac:Visit https://handbrake.fr/downloads.php in your browser.Click the Download (Intel 64 bit) below “macOS”.Click Allow.Click the installer file in your Downloads folder or web browser.Drag the Handbrake.app file to your Applications folder in Finder.
- Visit https://handbrake.fr/downloads.php in your browser.
- Click the Download (Intel 64 bit) below “macOS”.
- Click Allow.
- Click the installer file in your Downloads folder or web browser.
- Drag the Handbrake.app file to your Applications folder in Finder.
Open Handbrake.
Handbrake has an icon that resembles a cocktail glass and a pineapple. Click the icon in the Windows Start menu, your desktop, or in the Applications folder on Mac to open Handbrake.
Open the video file you want to reduce the size of.
You can either drag and drop the video file to the box on the right or click in the menu to the left. Then select the file you want to open and click .
- If you don’t see this screen, click Open source at the top of Handbrake.
Choose a filename for the output video.
It’s a good idea to set a unique name for any video you export. Type the file name you want to export the video as next to “Save as” at the bottom of the Handbrake.
- To select a new location to save the video to, click Browse and navigate to the location you want to save the video to.
Set where you want to save the output file to.
To do this, type a name for the video file next to “Filename” and select the folder you want to save it to. Then click
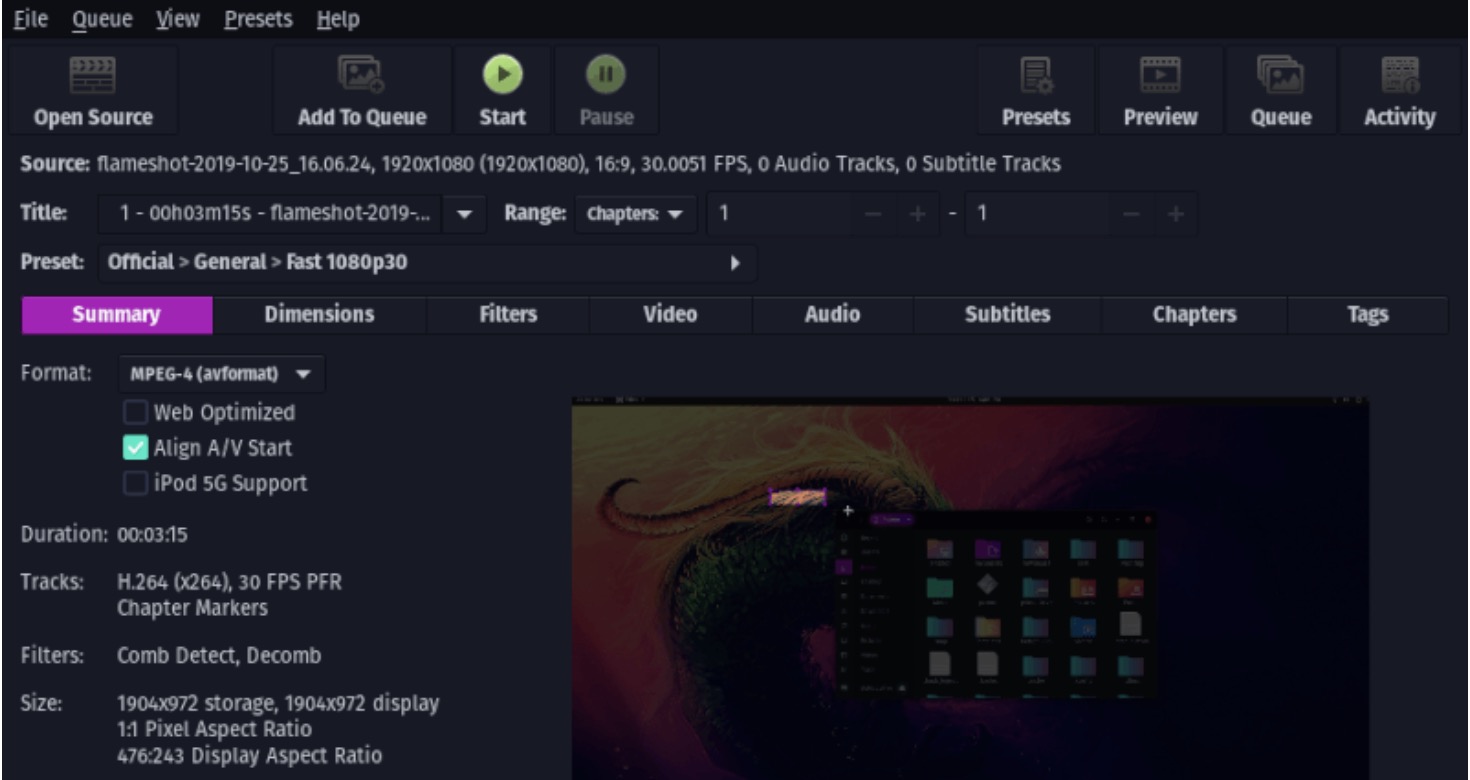
Ensure “MP4” is selected next to “Format”.
The drop-down menu is next to “Format” on the Summary page allows you to select the video format. MP4 is the most common video format. It allows for maximum compression and produces smaller video file sizes without reducing quality. If you don’t see this option, click the tab in the middle of Handbrake.
- If the original video file is in a different format besides “MP4” (i.g. .MOV, or .WMV), simply converting it to an MP4 file may do a lot to reduce the file size without having to reduce the picture quality.
Click the Dimensions tab.
This tab allows you to adjust the image size.
Type a smaller number into the “Height” and “Width” field.
This will lower the resolution of your video, which can drastically lower the file size. For example, changing the width value from 1920 to 1280, and the height value from 1080 to 720 will change the video from 1080p to 720p, resulting in a much smaller file. This will reduce the picture quality. You’ll want to keep the picture size proportional to avoid cropping or stretching. Some common video sizes include the following:
- 2160p: 3840w x 2160h (extremely large, 4K ultra HD).
- 1440p: 2560w x 1440h (larger).
- 1080p: 1920w x 1080h (large, standard HD).
- 720p: 1280w x 720h (medium).
- 480p: 854w x 480h (small).
- 360p: 640w x 360h (smaller).
- 240p: 426w x 240h (smallest).
Click the Video tab.
This tab allows you to adjust the video quality, codec, and frame rate settings.
Click and drag the Constant Quality slider to the left.
Increasing the value will lower the quality, which will result in a smaller file size.
- 20 is considered DVD quality. If you’re going to be playing the video on a small screen, you can probably go as high as 30. For larger screens, stick to 22-25 is good constant quality.
Use the drop-down menu next to “Framerate” to select the frame rate.
Framerate is the number of frames-per-second a video uses. A lower framerate can reduce the video size, but result in choppier motion. Anything above 20 frames-per-second (FPS), should look okay.
Click the Preview button.
You’ll see this at the top of the Handbrake window. This displays a still image from the video so you can check the image quality.
Check the Live Preview box.
It’s at the bottom of the Preview window. This plays a few seconds of the video at the quality you selected. If it looks okay to you, continue on to the next step. If the video quality is subpar, go back and raise the video resolution, framerate, and/or Constant Quality by just a tad.
Click the Start Encoding or Start button.
It’s the green play button at the top of Handbrake. This will start encoding a new video file with the specifications you set. The time this takes will vary greatly depending on the size of the video, your encoding settings, and your computer’s processing power.
Using iMovie on Mac
Open iMovie.
iMovie is the free video editing software that comes preinstalled on the macOS operating system. It has an icon with a purple star. You can find it in your Applications folder. Click the icon to open iMovie.
- But if you haven’t updated your Mac for a long time, or you bought a second-hand Mac for years, you may not run iMovie successfully. At present, iMovie is compatible with macOS 11.5.1 or later.
Click the Projects button.
It’s in the upper-left corner of iMovie.
Type a name for the new project and click Ok.
This can be whatever name you want to give your movie project. Type the name for the video in the bar next to “Name”. Click when you are finished.
Click the + button.
It’s the large square icon on the left. This displays a pop-up menu.
Click Movie.
It’s the blue button that appears in the pop-up menu when you click the large plus (+) icon.
Add the video file you want reduce to your project.
To do this, you can either drag and drop a video file into the panel that says “Import Media” on the left, or you can click in the panel and navigate to the video file. Click the video file to select it and click . This adds the video to your project.
Drag the video file down onto the timeline.
After you add a video to your project, simply drag it from the project panel into the timeline at the bottom of iMovie.
Click the File menu.
It’s in the menu bar at the top of the screen.
Click Share followed by File.
This opens a window that allows you to adjust the file and format of the video.
Click the Resolution menu and choose a smaller resolution.
This will decrease the actual size of the video frame, as well as reduce the file size. Reducing the resolution will not be as noticeable on smaller screens.
Click the Quality menu and select a lower quality.
This will reduce the visual quality of the video and result in a smaller file.
Click the Compress menu and select Faster.
This will compress the video more so that is has a lower file size.
Click Next.
It’s in the lower-right corner of the screen.
Type a name for the file.
This will be the video filename once the file is exported. Type a name for the video file next to “Save as”.
Click Save.
This will save the video with the settings you selected. It may take a while to convert for longer videos.
Using Video Compress on Android
Download and install Video Compress.
Video Compress is a free app you can download and install from the Google Play Store. It can be used to compress your videos to smaller files sizes. Use the following steps to download and install Video Compress:
- Open the Google Play Store on your Android.
- Tap the search bar.
- Type “video compress” in the search bar.
- Tap Video Compress.
- Tap Install.
Open Video Compress.
When Video Compress finishes downloading, tap the Video Compress icon on your Home Screen or Apps Menu to open Video Compress. It has a blue icon with a clamp on the front. You can also tap in the Google Play Store once the app finishes installing.
Tap Allow.
When you first launch Video Compress for the first time, you need to set the permissions. Tap in the pop-up alert to give Video Compress access to your video files.
Tap the folder containing your video files.
This is typically in “Camera.” Tap any folder containing the video you want to downsize.
Tap the video you want to reduce the size of.
This opens the video in Video Compress
Tap Compress Video.
It’s at the top of the list of options on the left side.
Tap the resolution you want.
The menu lists a variety of resolutions for you to choose from. When you tap an option, it will immediately start compressing your video. Allow a few minutes for it to finish.
- This will save a compressed copy of the video in a new folder called “SuperVideoCompressor”. You can find this folder in your Gallery.
Using Video Compressor on iPhone and iPad
Download and install Video Compressor.
Video Compressor by Niu Lixuan is a free app available from the App Store. It can be used to reduce the size of videos on your iPhone or iPad. Use the following steps to download and install Video Compressor.
- Open the App Store.
- Tap the Search tab.
- Type compress video into the search field and tap Search.
- Tap GET next to Video Compressor.
Open Video Compressor.
It has a blue icon with a film strip on the front. Tap in the App Store once Video Compressor is finished downloading or tap the Video Compress app on your Home screen.
Tap OK.
When you first open Video Compressor, you need to set the permissions. Tap in the pop-up alert to allow Video Compressor to access your video files.
Tap the video you want to compress.
You can tap any category in the list to the left to sort your videos by category. Categories include “Recents”, “Favorites”, “Places”, “Selfies”, “Slo-mo”, “Time-lapse”. Tap to view all your videos. Then tap a video in the list to the right to open the video.
Tap Import.
It’s the pink button at the bottom of the screen.
Tap the Preset button.
It’s the pink button at the bottom of the screen next to the slider bar. This displays a menu that allows you to choose a video resolution.
Choose the resolution you want.
Simply tap the resolution you want to pick it. There are five choices to choose from. Smaller resolutions will result in smaller video file sizes, but also reduce the image quality in the video. “Full HD (1920×1080)” is the largest resolution. “HD (1280×720)” is slightly smaller HD. “D1 (720×576)” is a medium sized resolution. “480p (640×480)” is a small resolution. “CIF (352×288)” is the smallest resolution.
- To pick a custom resolution, tap Advance at the bottom. Drag the “Width” and “Height” slider bars to the left to lower the video resolution. Drag the “Frame rate” slider bar to the right to lower the video frame rate. Anything above 20 FPS should look okay. Drag the “Bitrate” rate slider bar to the right to lower the video bit rate, which will lower the image quality of the video. Tap Ok when you are done.
Tap and drag the slider bar at the bottom.
It’s in the green bar at the bottom. Drag it to the left to reduce the bitrate. This reduce the file size of the video, but it will also result in a lower image quality for the video. The default target size is about 50%. Drag the slider to the left to lower the video quality and reduce the file size.
Tap Compress.
It’s the pink button at the bottom of the screen. This saves a separate copy of your video at your chosen video settings. It may take a few minutes for it to finish processing.
- If you want to delete the original video when it’s done processing, tap the red button that says Delete original video when it is finished processing.