Mounting a TV on your wall allows you to watch it comfortably without using an entertainment center, but the cables may look messy when they hang down. While it’s against electrical code to run your TV’s power cable behind your wall, you can install an in-wall power extender that allows you to add a new outlet without any complicated wiring. Start by choosing a mount that’s compatible with your TV and attach it to your wall. Once you have the mount in place, cut holes in your wall so you can run the wires between the power extender receptacles. After installing the extender, hang the TV on the mount and plug it in!
Installing the Wall Mount
Choose a wall mount that can support the weight of your TV.
Look for the dimensions and weight of your TV in its instruction manual or on its box so you know how much the mount needs to support. Find a mount at an electronics store or online and check the maximum weight and size that it can hold. Opt for a full-motion mount so you can tilt and swivel your TV if you need to make adjustments.
- Try searching online for your TV’s model number followed by “mount” if you want to ensure the mount works with your television. You can usually find the model number on a sticker on the back of the TV or printed on the box.
- If your TV is lighter than 80 pounds (36 kg), you can use a mount that attaches vertically. If your TV weighs more, you’ll need a mount that secures horizontally so it evenly distributes the weight.
- If you aren’t going to mount the TV into studs, use anchor bolts to keep the TV from falling off of the wall.
Find a spot to mount your TV so it’s at your eye level when you watch it.
If you plan on watching your TV while sitting in a chair or couch, place it so the center of the screen is around 42 inches (110 cm) up from the ground. Search for a place in your room where you can fit the TV so people can watch it from multiple angles. Don’t install the TV so high on the wall that you have to tilt your head at more than a 35-degree angle since it can cause neck strain.
- Ask a helper to hold the TV against your wall so you can trace around it with a pencil. Surround the outline with painter’s tape so you can get an idea of how much space the TV takes up.
Check the wall with a stud finder to see if there are any studs.
Turn on your stud finder and hold it flat against your wall. Slowly slide the stud finder horizontally across your wall until it beeps or a light blinks. Mark the location of the stud with a pencil before moving the finder over by about 16–18 inches (41–46 cm) so you can locate another stud.
- If you don’t have a stud finder, try knocking on your wall and listen for a solid sound, which means there’s a stud behind it. If you hear a hollow or echoing sound, then there isn’t a stud.
- Run the stud finder vertically between the studs of your wall to check if there are any horizontal studs, also known as fire blocks. Try to avoid studs that have a fire block between them underneath the mount since you won’t be able to easily fish wires through.
- You can still mount your TV on the wall if you don’t have any studs, but you absolutely must use wall anchors..
Hold the mount against the wall to mark the holes.
Take the section of the mount that attaches to your wall and hold it against the wall so it’s perfectly level. Use your nondominant hand to support the mount and find the holes along the top and bottom that line up with the studs. Make dots on your wall that line up with each of the holes so you know where to attach them.
- If your wall doesn’t have studs, choose 3 holes along the top of the mount that are evenly spaced apart and mark them. Then choose 2 evenly spaced holes on the bottom of the mount.
Pre-drill holes in your wall where you marked them.
If your wall has studs, use a drill bit with a diameter 1⁄8 inch (0.32 cm) smaller than the diameter of the screws provided with the mount. If you don’t have studs, choose a bit that’s 1⁄4 inch (0.64 cm). Hold the drill so the bit is perpendicular to the wall and slowly bore holes through each of your marks.
- Don’t mount your TV without pre-drilling holes first since you could damage your wall.
- If you have metal studs, use a drill bit that’s made for going through metal, or else you could damage or break it.
Slide 1⁄4 in (0.64 cm) toggles bolts into the holes if you don’t have studs.
Toggle bolts are hollow fasteners that have hinged ends to hold them securely against the back of the wall. Pinch the hinge closed so it’s against the main body of the toggle bolt and slide it through the hole. Push the small plastic ring on the front of the bolt so it’s flush with the wall before snapping off the long plastic piece extending out. Put toggle bolts in the rest of the holes.
- You can buy toggles bolts from your local hardware store.
- You don’t need to use toggle bolts if you have studs in your wall.
Screw the mount into your wall.
Hold the mount against your wall so the holes along the top and bottom line up with the holes you just drilled. Feed the screws provided with the mount kit through the holes on the mount and tighten them by hand. Finish tightening the screws with a screwdriver to secure the mount.
- You may need a hex wrench if the mount uses hex bolts.
Wiring an In-Wall Power Extender
Get an in-wall power extender.
An in-home power extender has 2 receptacles that connect behind your wall and provide power to an additional outlet. When you plug the lower receptacle into a wall outlet, it will provide power to the upper receptacle that you can hide behind the TV. Look at an electronics store or online for a power bridge that has built-in power connectors so it’s easier to wire.
- You can buy in-wall power extenders from electronics stores or online for between $40–100 USD.
Trace the outlines of the power extender receptacles on your wall.
Hold the upper receptacle against your wall in a spot that your TV will cover once you hang it. Use a pencil to draw an outline around the receptacle. Place the lower receptacle straight down from the first one so it’s at least 6 inches (15 cm) off of the ground, and draw the outline on your wall. The lower receptacle will be visible on your wall, but you can easily hide it behind a shelf or entertainment center.
- Make sure both receptacles are between the same studs if your wall has them so it’s easier to fish the wires.
Cut along your outlines using a drywall saw or utility knife.
Push the blade of the saw or knife into your wall so it breaks through the other side. Use a slow and straight sawing motion to slice through the drywall along the outline you drew. Pop the piece of drywall away from the wall after cutting it out. Repeat the process with the other outline that you marked.
- You can buy a drywall saw from your local hardware store.
- If you have brick or concrete walls, hire a contractor to cut through it for you so you don’t cause any additional damage.
Fish any AV cords and the power connector between the holes in your wall.
Feed a fish tape, which is a tool with a long line used to run wires through walls, into the upper hole and push it straight down. Pull the fish tape out from the hole for the lower receptacle when you see it. Tape any HDMI, AV, or network cables you want to plug into your TV to the end of the fish tape, as well as the power connector cable that’s attached to the back of the lower receptacle. Pull the fish tape up through the upper hole to pull the wires through. Make sure the AV cords extend out about 3 feet (91 cm) from each hole.
- The number of cables you pull through depends on how many devices you want to plug into your TV. Usually, you’ll need at least 1–2 HDMI or AV cables to attach a cable box or media player.
Plug the power connectors from the receptacles into each other.
Locate the power connector on the back of the upper receptacle and line it up with the connector you fished through the wall. Push the connectors together to secure them so electricity can run between the 2 receptacles. Feed the power connectors back into your wall once you plug them in.
- You do not need to turn off power at the circuit when you install an in-wall power extender since you aren’t connecting it to any existing wires.
Push the AV cords through the holes in the receptacles.
Look for the holes in the receptacles that have rubber or plastic guards surrounding them. Push the ends of the AV cords through the back of the receptacle so they go through the hole in the front. Repeat the process with the other receptacle so the wires extend about 3 feet (91 cm) out from each side.
- Be sure to put the cords through the receptacles before you screw the receptacles in, or else you won’t be able to pull them through easily.
Screw the receptacles into your drywall with a screwdriver.
Push the receptacles into the holes so they’re flush with your wall. Place the screws into the holes along the outer lips of the receptacles and screw them directly into your drywall. Be careful not to overtighten them or you could damage your walls or the receptacle.
- You do not need to pre-drill holes before screwing in the receptacles.
Connecting Your Hardware
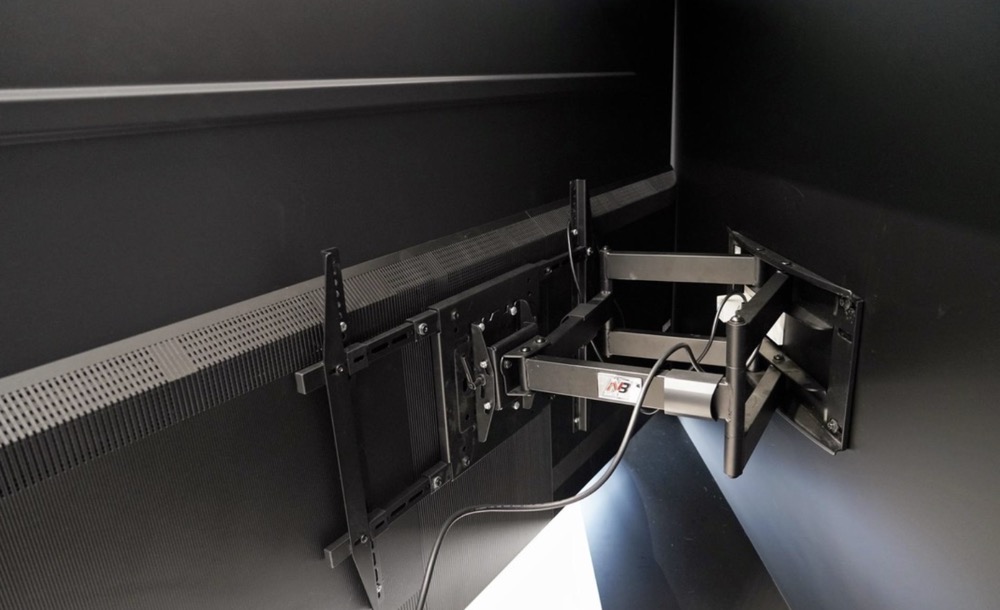
Screw the vertical brackets from the mount onto the back of your TV.
Position the brackets on the back of your TV so they line up with the 4 screw holes near the corners. Feed the screws provided with the mount through the holes in the bracket and tighten them by hand. Finish screwing them in with a screwdriver so the bracket is tight against the back of your television.
- Some mounts may have X-shaped brackets.
- Don’t overtighten the screws, or you could damage your TV.
Secure the brackets to the mount on the wall.
Look for the clips or hooks on the bracket that attach to the mount on your wall. Lift your TV and set the brackets onto the lip at the top of the mount so it supports the weight of your TV. Check if there are any screws on the bracket or mount that you need to tighten so the TV doesn’t fall off of your wall.
- Ask a helper to support the TV while you tighten the brackets to the wall mount so you don’t have to do it on your own.
- Take a few steps back from your TV to see if it’s level. If it isn’t, try grabbing the sides of your TV and rotating it to make the adjustment. If the TV doesn’t move at all, loosen the screws on the bracket or mount before moving the TV again.
Plug the TV’s power cord into the upper power extender receptacle.
Wrap the power cord for the TV around the mount if you’re able to so it doesn’t hang down. Push the plug into the outlet on the upper receptacle just like you would use a standard outlet.
- Your TV won’t have power until you plug the lower receptacle into another wall outlet.
Use the extension cable to plug the lower receptacle into an existing outlet.
The extension cable from the power extender kit has a male end with prongs and a female end with an outlet. Plug the female end of the cord into the prongs on the lower receptacle, and attach the male end to a nearby wall outlet to power it.
- The electricity from the existing wall outlet will travel through the connectors inside the wall and provide power to the upper receptacle.
Attach the AV cables to the back of your TV and your devices.
Take the AV cords from the upper receptacle and wrap them around the mount so they don’t hang below the TV. Push the cords into the matching ports on the back or sides of the TV so they have a firm connection. Take the lower ends of the cords and plug them into any devices you’re connecting, such as media players, cable boxes, or game consoles.
- Keep a small shelf or stand under your TV to hold your devices and hide the lower receptacle from view.
Tips
- If you aren’t able to cut into your walls, you can also feed the cables through a cord cover and secure it vertically to your wall with adhesive strips or screws.
Warnings
- Do not run the power cable from the TV behind your walls since it’s against electrical code and could become a fire hazard. You can only run the AV cables behind your wall.
- Avoid mounting your TV over a fireplace since smoke and soot could damage the internal electronics, and it won’t be at the most comfortable viewing angle.