A coaxial cable (coax) brings TV and internet signals into homes and other buildings. These cables need connectors on the end to hook up to appliances like TVs and transmit signal. If you have a coax cable without a connector, installing your own is a simple task. Strip the wire and expose its inner conductor. Then push a connector over it and crimp it in place. For tight spaces, use a right-angle connector to avoid bending the cable too much.
Choosing and Stripping Cables
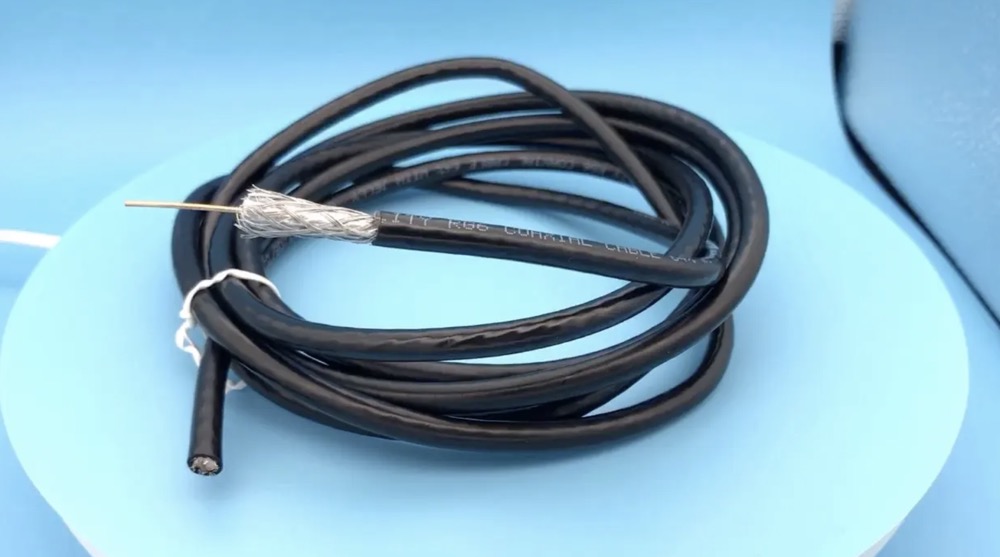
Determine whether you have an RG59 or RG6 cable.
These are the 2 most common types of coax cables, and you probably have one or the other. The easiest way to tell is to look at the rubber housing of the cable. The type should be printed here.
- The main difference between the cables is that RG6 is thicker and has more padding than RG59. This makes it more durable, and a more common choice for cable and internet wiring.
Get a connector that matches your cable type.
The most common coax connector is F type. Find an F type connector at a hardware store and match it to your cable width. Get one for each cable you’re connecting.
- There are also N type connectors, though these are much less common in home installations.
- F type connectors still come in a variety of styles, including crimp and twist on. Speak to a store employee if you don’t know which option is best for you.
Cut through the rubber 1⁄2 inch (1.3 cm) from the end of the cable.
Use either a wire stripping tool or a razor. Measure 1⁄2 inch (1.3 cm) from the end of the cable and cut around the outer rubber layer. Then pull it off to expose the mesh underneath.
- Don’t cut all the way through the cable. Just cut the outer rubber covering. Cutting too deep will damage the connection.
- If you use a razor to do this, be very careful. Don’t put your finger in the path of the blade and hold the cable tightly.
Peel the wire mesh down.
This wire mesh is the second layer of the cable. Use your fingers or a pair of pliers and peel the mesh back. Fold it down over the rubber housing below the first cut you made.
- A wire stripping tool could cut through this section and remove it, but be careful if you do this. Don’t cut deep enough to damage the conductor in the center of the cable.
Trim the dielectric plastic 1⁄4 inch (0.64 cm) from the end of the cable.
The final layer of insulation for the cable is a white plastic housing around the main conductor. Use a wire stripper or razor and gently cut around the plastic 1⁄4 inch (0.64 cm) from the top. Then peel it away to expose the copper conductor underneath.
- The plastic may be foil-covered.
- Be especially careful when removing the plastic covering. If you damage the conductor, your signal will be weaker.
Remove any pieces of wire mesh touching the conductor.
If any part of the mesh touches the conductor, it interferes with the signal quality. This is called a stinger. Double check that the entire wire mesh is peeled back, and no parts touch the conductor.
Attaching a Crimp Connector
Slide the crimp ring over the cable.
Leave it below the spot where you cut so it’s out of the way until you need it. Make sure you slide the ring on first, or you’ll have to remove the connector later on and start over.
- Not all connectors have separate crimp rings. Some connectors have the crimp ring already attached. Check which type you have.
Push the connector over the cable so the copper conductor sticks out.
Hold the cable in one hand and the connector in the other. Then insert the conductor into the hold in the center of the connector. Continue pushing until the conductor sticks out just above the edge of the connector on the other side.
- This will take some pushing because the connector have to wedge in between the rubber housing and plastic layer. Try twisting the connector back and forth a little to work it onto the cable.
- If you’re installing the cable outdoors, remember to use a waterproof connector. This is housed with rubber.
Crimp
A crimping tool pushes the crimp ring completely inside the connector, securing the connection. Select the correct die, or width, for the cable you’re using. Then insert the cable into the crimping tool. Squeeze the handle until you hear a click, indicating that the crimp is complete.
- Some crimping tools work differently. Follow the directions on the specific tool you use.
Trim away any wire mesh coming out from under the connector.
These metal pieces could interfere with your signal or wiring. Check around the connector for any wires coming out. If you see any, use a wire cutter and trim them away.
- No bare wire should be showing.
Installing a Right-Angle Connector
Place the connector base over the wire.
Most right-angle connectors have a base piece that holds the housing together. Slide this base over the stripped wire so it’s there after you install the connector.
- Remember to slide the base on first, before installing any other pieces of the connector. If you forget, you’ll have to remove the connector and redo the process.
- Some right-angle connector kits are different. Follow the procedure on whichever product you use.
Loosen the screw inside the connector.
The front portion of the connector housing has an internal screw that carries the signal. Turn the screw counterclockwise to loosen it.
- Don’t remove the screw completely. Just loosen it.
Touch the conductor to the screw and tighten it.
Insert the cable into the housing so the conductor touches the screw. Hold it in place and turn the screw clockwise to tighten it. Form a snug connection so the cable stays in place.
- Only tighten until the screw is snug. Don’t overtighten it or you could damage the copper conductor.
Install the back housing of the connector.
Take the back portion and line it up with the notches on the front. Then press the 2 pieces together with the cable in between them.
- Some connectors may click together at this point. Continue holding the pieces together just in case they don’t automatically attach.
Twist the connector base around the connector.
The base locks the two sections together. Push it up until it reaches the connector, then twist it over the two pieces. Make sure the connection is snug, then the job is complete.
Finished.
Tips
- If you have high speed internet and more than two TV’s, make sure you use a high quality RG 6-type connector.
- Screw-on style F connectors usually provide a weaker connection, and signal can bleed out of the cable. Crimp-style connectors are better for a strong signal.